INTRODUCTION
This is my tutorial on creating a "strange friendship" and actually I was not planning to do a lesson on this figure, so it will not be very detailed. But I do hope that you learn something from it and be inspired to create something similar. I used Photoshop CS5 and tablet WACOM Classic A6, original image size 4581h7000 pixels at 300 dpi.
SKETCHES AND IMAGE USED TO CREATE THIS PICTURE
Well, most of my drawings are realistic enough. I combine fantasy with reality for these drawings. The idea came to me out of the Bremen Town Musicians, and I interpreted it in their. So I started to look for inspiration and images, in order to develop this concept. Here is a sketch of the concept and composition.
Step 1 - First, I set the background to 50% gray, created a new layer above the background layer and it will be a sketch. Then I lowered the Opacity (Opacity) to 50%, create another layer and began to draw a small sketch of a pressure-sensitive brush.
Then, when I finished - I combined the two layers, this is my style of work, and added new layers, which I will also merge in progress, because so you can more easily control the process. Form and I left the background on different layers.

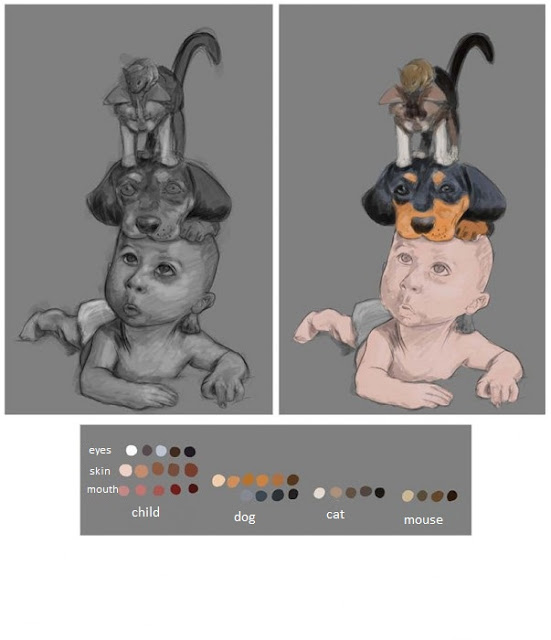
Step 2 - Now I'm going to add another layer of shadows and highlights. I do not begin with the colors, because at first I want to see what result I will have in the end, and then just going to paint. For colors, I add a new layer, but this time it will be located under the thumbnail. I am doing this in order not to lose sketch lines. But this is my approach, and you, of course, can also add a layer on top of the sketch, but then you have to set the layer mode to Multiply (Multiply), and the background should be white, because if you fill it with another color, the eventually you will not be able to see the colors in their true Slices (Frequency). However, now I have to start working with colors, but first I need to create a mosaic of colors for each character (a child, a dog, a cat and a mouse).
In order to create this mosaic, I create a new layer, which will be located on top of the others and will be used as a layer palettes. As for the brush, I'll start with a round (hardness (Hardness) - 100% intervals (Spacing) - 10%). Now, I'll paint the base color, occasionally turning to images that inspire me. Color palettes will match the colors in the images. At this point I will not go into details and will not even approximate figure. I'm just trying to show the options and work with light and shadows of the base color.
So, I already have a basic color and shadow and light. Now, I figure a little closer and a brush with a smaller diameter - is the right approach, because you start with a large brush, and in the process of approaching the figure you are reducing it. My next step is to create a new layer. This layer I put on a drawing of lines and cut lines sketch layer to 50%. Now I am working on a new layer, working through detailed design, and I'm going to start with the child, then to continue drawing, mixing colors, and occasionally turning to me inspiring image. Brush and drawing technique remain the same as long as I reach the desired result.

Then I turn to the detail of the dog, then the cat, and then click. All characters are on separate layers, as in this case, it will simplify the work, but you should always combine the completed layers. This way you can save a huge amount of memory. Although, as a kind of backup, I save jpegs for this drawing after every couple of steps, and I think it's a good idea. In any case, I will choose another animal brush. I use a brush for the hair, but you'll have to make some changes in order to use it for drawing wool. At this stage the work is complicated. I have to be very careful with respect to inspiring images, but at the same time continue to develop different forms. It is also very important at the time to stop working, even if you are very good at drawing, as in this case, again, going back to work on this pattern you may want to make some changes: fix, remove or add anything. After I spent a lot of time on the details, I zoom in and out the picture and see how it comes alive. For animals I swapped round brush to brush the fur. After I finished with the characters, I get into the background. It is important to start with the background at an early stage, as it should be complementary characters, in view of the fact that the colors are interrelated ... but for this drawing I had a mental picture of what will be the background, so I just needed to make sure that the characters and the background match.


Almost finished! And, as I said earlier, when I go along in the process - I combine layers and now my characters and background are on separate layers ... Then I create the last layer, and it is for compatibility between the shadows and light of the characters and the background.
Well, that's all ... Sorry for the brevity of the lesson, I just did not plan a lesson, as a priority, and the project was very voluminous: a lot of detail and work. Total time spent on this project - about 2 weeks. I hope this lesson you learn something, and to encourage further work.
Continue to work hard and never give up ... "There are no limits of imagination."
Author: Brahim Azizi (Brahim Azizi), Morocco


